Tuesday, December 21, 2021

Easy card Box with a Window


Here are the score measurements


Here is how the cuts should look.


Sunday, December 5, 2021


A Very Tim Holtz Christmas

Today I did another little something different.  I don't usually mass produce cards, I like to make a different one for everyone on my list, and for some on my list, VERY different is right up their alley!

You can watch the video here:

Products Used Paper from the Paper Stash paper pack by Tim Holtz and Idea-ology joann.com Dash Away 665468 thinlit die set, only available at Simon Says Stamp for free with a $25 purchase of Tim Holtz Products while supplies last. https://www.simonsaysstamp.com/ Alpine 664225 on sale now for $4.50 https://www.sizzix.com/664225/sizzix-thinlits-die-set-7pk-alpine Distress Oxides in the colors Stormy Sky, Faded Jeans, Chipped Sapphire, and Ground Espresso. Tim Holtz Glitter in the color Tinsel. Available at Ranger Ink https://shrsl.com/2hs73 be brand watercolor paper from Walmart Reptile Adhesive


Wednesday, December 1, 2021

Outside


Inside

You'll Shoot Your Eye Out!

Thought I would show you something fun to make from a downloaded digital stamp from MarkCombsDesigns on Etsy.


Supplies used: be Watercolor paper (from Wal-Mart) Tim Holtz Distress Oxides in the colors Fossilized Amber, Ground Espresso, Vintage Photo, Gathered Twigs, and Pumice Stone. Tim Holtz Distress Ink in the color Vintage Photo Tim Holtz Distress Ink Spray in the color Brushed Corduroy. Versafine Clair ink in the color Pinecone Lavinia Elements ink in the color Mulberry. Tim Holtz Stencils - THMM3 and THS009 I cut the printable design in my Cricut using the Cut then Print function and they were printed on Hammermill 80lb card stock.


Vintage Cardinal

Remember this little cardinal die we got for free last year from Tim Holtz and Simon Says Stamps? Even though he is last's years flavor, to me he is still extremely relevant as are most of the stamps and dies from Tim Holtz.

I can hardly wait to get this year's model, Dash Away! I did buy enough product to get two. I will keep one for myself and the other I will give away on my YouTube channel.


Products Used:
Tim Holtz Distress Spray Stain in Antique Linen
Tim Holtz Distress Oxides in Antique Linen and Forest Moss
Tim Holtz Stencil THS032
Tim Holtz Foliage 661597
Tim Holtz Cardinal 664804
Tim Holtz Stamp set Christmastime 3 CMS427
Gina K ink in Fresh Asparagus
Simon Hurley inks in Guppy, Woof, and Bee Sting
Versafine Clair inks in Pinecone and Shady Lane
be brand watercolor paper
Reptile Adhesive
Generic red cardstock


Monday, November 29, 2021


Here is a picture of the front of my second junk journal made especially for Christmas!  See video below for a look at all of the pages!


Sunday, November 21, 2021


I thought I would play around a bit and came up with this.  I started with the background and some Tim Holtz Distress Ink Sprays, Oxides, and Mica Stains.  I sprayed the very top with Chipped Sapphire Spray Stain followed by Villainous Potion, Peacock Feather, and Fossilized Amber. I then gave the top a couple of squirts of Hocus Pocus Mica Stain.  I followed that up with a couple of squirts of Salvaged Patina Oxide Spray then took an identical piece of watercolor paper and smooshed it right on top for a wonderful "twofer."

I let that dry then went to town with my Tim Holtz Distress Crayons in Hocus Pocus, Frosted Juniper, Tree Lot, Flickering Candle, Snow Flurries and some Forest Moss.  They are just scribbled on then blended with my finger.

Next, I used the negative of one of the bucks that I cut for another card from the Sizzix and Tim Holtz "Darling Deer" die set as a stencil to stencil in the black buck with some Versafine Clair Nocturn ink and a small, soft stencil brush.  I cut the second buck from Idea-ology Volume I Backdrops paper and glued him on in reverse.  

I "painted" the ground with a small stencil brush and Versafine Clair ink in the color Acorn. 

I cut a circle in the same paper to create the moon and then used the negative to darken one side creating a crescent moon and glued it on.  

I cut the trees from a Penny Black die set called Tall Trees from one of the papers from Idea-ology paper called Abandoned and glued them on.

I used a small spade knife to spread on the Icicle Crackle Paste on the bright side of the moon and let it dry overnight.

I used some Matte Distress Texture paste through a dotted Tim Holtz stencil to get some of the stars and some were stars that I had cut out of gold cardstock from Tim Holtz Swirling Stars die and glued on.

Finally, I stamped the sentiment from the Bold Tidings Minis stamps set from Tim Holtz onto the same paper that I cut the buck from then cut it apart, distressed the edges with the Acorn ink, and glued them down.  

I glued the panel down to a piece of fun foam and let it dry and glued another piece from another Tim Holtz paper pack that was a scrap from a 12x12 pad that is long gone, so I can't name it on to a 5 1/2 x 4 1/4 card base and distressed the edges then glued the panel onto it.  I trimmed the tiniest bit off the edge of the card base to get the paper slivers that I glued on in the two random spots.

Thanks for visiting!
Tee


Saturday, November 20, 2021


Second Entry into the Mod Squad Challenge Nov 2021


Friday, November 19, 2021


My November Entry number 1 for Kitchen Sink Stamps. Holiday card with animals.  Who says Winter Solstice isn't a holiday!


Thursday, November 4, 2021


Kitty Loves Christmas!

Greetings! Here are the steps I took to create this card.

1. I grabbed a piece of watercolor cardstock (be brand from Walmart) sprayed it with some water and then coated it with Tim Holtz Distress Spray Stain in the color Antique Linen and then dried it and trimmed to 5 1/4 x 4 inches.

2. I picked random stamps from the Tim Holtz and Stamper's Anonymous Holiday Postmarks CMS 323 and laid my stained paper in my Tim Holtz Stamping Platform then laid the stamps out how I wanted them.  Pretty randomly.  I picked up the stamps with the lid and inked them up with Versafine Clair ink in the color Nocturn.  I repeated this twice to get them nice and dark and let the ink dry completely.

3.  I grabbed some of my Simon Hurley re-inkers in the colors Viper, Game Over, Shooting Star, over the Moon, No diving, and Grrr and water colored the stamps with the ink and my water brush and let that dry completely. 

4. On a separate piece of watercolor paper I stamped out this Kitty Watching stamp #SD635 from Technique Junkies also with the Versafine Clair in Nocturn with 3 layers of ink and let that dry completely.

5. I painted the kitty with my Simon Hurley re-inker in Woof and a little bit of Rosy Cheeks for the nose.  I colored the eyes with a gold gel pen and outlined with a black Sharpie. I let that dry then fussy cut it out.  I edged it with a black marker and set aside.  

6. I got out my stamping platform and also stamped the kitty direct onto the background to preserve his little whiskers, then I glued the cut out piece right on top.  

7.  I took a piece of scrap watercolor paper and made a fairly thick coat of Simon Hurley's Lunar Paste in Bee Sting and laid in the twine and let that dry (took an hour or so.)

8. I created shadows along the postage marks and the kitty using a charcoal pencil and then rubbing with my finger.

9. I glued the background to a tent fold 5 1/2 by 4 1/4 red card base then trimmed the rectangle shape of the package to the size I wanted and glued it under the kitty.


Wednesday, October 27, 2021


 I created multiple double ink stations for my most frequently used inks and oxides. Watch the video to see how!

In this video I will show you how I make this little move-proof ink station. The video is rather long, but I wanted to make sure you saw the whole process. Inspiration linked down below. 

Jen of Eve Designs - https://www.youtube.com/c/jenofevedesigns/featured 

WiKi for Juanita Musson - https://en.wikipedia.org/wiki/Juanita_Musson 

Ink used was Tim Holtz Distress Oxide in Vintage Photo 

Chipboard - https://amzn.to/2ZoVBPy 

Reptile Adhesive - Sold out at the moment. 

Sticky Tape - Scrapbook.com 

Silicone Shelf Liner - https://www.qvc.com/Cooks-Essentials-72%22-x-24%22-Silicone-Grid-Mat.product.K50784.html?sc=CRT 

Idea-ology Christmas Worn Wallpaper - https://stampersanonymous.com/tim-holtz-idea-ology-christmas-worn-wallpaper-th94088.html 

Finger Blending Sponges - https://amzn.to/3Bpwych 

Soft Make Up Brushes - https://amzn.to/3mkudet 

Finger Blade Knife - https://amzn.to/3nsGltm

Friday, October 22, 2021


Mod Squad Challenge Entry 2 for Halloween using Kitchen Sink Stamps Scaredy Cat!


Mod Squad Challenge Entry 1 for Halloween using Kitchen Sink Stamps Scaredy Cat!


Sunday, October 3, 2021


I created this one layer card with the Stamptember 2021 Stamp and Mask set from Tim Holtz and Stampers Anonymous.

I'll walk you through the process!

First I stamped the Santa on a piece of transfer tape then covered that with another piece of transfer tape and then cut the whole thing out except the tassels on the toy bag and the antlers.  You can see more about my process here.

Next, I grabbed a 5 1/2 x 4 1/4 piece of white Accent Opaque 120lb card stock and positioned it in my Mini MISTI tight in a corner with the foam out.  I stamped out Santa and his sleigh with Black Soot Archival ink and left the stamp in my platform.

I masked off the stamp and the moon area with the included moon mask so I could blend the background.  I started tight around the moon with Salvaged Patina Distress Oxide in a circular motion.  I then started blending around that with Prize Ribbon Distress Oxide blending both colors back and forth until they were well blended and proceeded to blend the rest with the Prize Ribbon.  

Next, I removed the Moon mask and blended the moon with Antique Linen Distress Oxide and colored in the stencil portion with Fossilized Amber Distress Oxide.  I then removed the Santa mask as well.

Using tiny make up brushes and a small paintbrush I blended the back of the sleigh starting from the middle with Abandoned Coral Distress Oxide then finished the rest off with Candied Apple Distress Oxide.  I painted the reindeer with Vintage Photo Distress Oxide.  I colored in the skids and the hardware with a silver Sakura sparkle pen and colored the reigns with a black POSCA pen.  

I let that dry then placed the card front back in my MISTI in the same position and stamped over it with the Black Soot Archival ink.

I stamped the star belt with Tsukineko in Moonlite then stamped the sentiment with Versamark and coated it with white embossing powder and heat embossed it.  I made some little glows with some Ranger Arctic White pigment ink and made white dots in the center with a white POSCA pen. 

I colored the inside of the moon with Wink of Stella then used a glue pen to draw around the moon and color in Santa's fur and then dumped Lawn Fawn's Prisma glitter on top!

I glued that down to a Kraft card base and my first of many was done!

Here is my YouTube video with more detail 


Tuesday, September 28, 2021


Mod Squad Challenge September 2021


Wednesday, September 15, 2021


Getting going on a very busy holiday season. I have collected a huge list of people that will get handmade cards from me this year.

My hopes, that I get these done, addressed, and stamped ready to go by Thanksgiving! Wish me luck.

This is my take on a grungy candy stripe.

I started out by using a 6x4.5 piece of heavy watercolor paper that will be trimmed down later.  Normal watercolor paper starts out in a 12x9 format. I cut the pages into quarters for my projects. This leaves me some wiggle room to trim off runny edges!

With a half inch soft, flat brush I start out by painting the stripes on and using a rule to just kind of keep them straight with my Simon Hurley re-inker in the color of Game Over.  That and Over the Moon are my favorites of his. Once I have the stripes painted on I take a dropper full of water and drip down the center of the stripes by holding the paper in the angle of the stripe.  With the same brush and the runoff from the stripes I splatter a bit all over the card.  I dry the card a but and then give it a few spritzes of water from a distance to get the color to bleed a bit then fully dry it to prepare for the next step.

Once the panel is dry, fully dry, I manipulate the paper to straighten it out as best as possible.  I trim enough off of each side to make the panel 4 x 5.5.  Using a large blending brush I go over the entire page with Antique Linen Distress Oxide and do the same to the edges only with Vintage Photo Distress Oxide.  

Next, I use some good double-sided tape 1/8 inch wide and line it along each of the stripes on just one side. You can do both sides as well, I prefer this look.  I make sure to burnish down each tape before I remove the backing.  With the panel sticky side up I lay it on a piece of copy paper and pour the glitter all over the paper.  I tap off as much as I can then take the other half of the copy paper and burnish the glitter into the tape.  Note: you can also use toner foil on this step if you are allergic to glitter!

Here is the video I created with these steps and more!


Thanks for stopping by! By the way, I have started a Facebook Group called Not Afraid of Color and would love to see your makes inspired by my demonstrations!


Monday, September 6, 2021

Lets Creep it Real Folks!


 Here's a mixed media card using a different background technique I demonstrated on my YouTube Channel.


First I created the background using Black Soot Distress Ink and Hickory Smoke Distress Oxide using the blowing technique.  The first layer was the Black Soot followed by a top layer of Hickory Smoke.  I then completed the background with some mica spray from my stash from Technique Junkies.  I trimmed it down to 4 x 5 1/4 using my Tim Holtz Deckle Trimmer.

I layered some foam tape on the background and covered it with some gauze that I had colored with the Distress Mica Stains then glued it down to a 5 1/2 x 4 1/4 black card base.

For the bug I sprayed some scrap watercolor paper with Distress Mica Stain in Jack-O-Lantern and Crooked Broomstick and a little bit of Crackling Campfire Distress Spray Stain. I dried it then cut out the bug and stamped it with the Distress Archival Ink in Black Soot. I stamped the bug again on some vellum with some Versa-Fine Clair and then heat embossed with clear embossing powder from Ranger. I cut out the little wings and then used some Glossy Accents to raise the body and help the little wings stick on. I spotted his eyes with some red Posca pen after the Glossy Accents had dried.

For the sentiment.  I cut out one of the sentiments from the Reverse Sentiments Halloween from Simon Says Stamps then colored the outside edges black.  I laid down some of the Grave Texture Paste on a scrap of velum and then smashed the sentiment into it so the paste would ooze out and cover the sides.  I let it dry then trimmed it and distressed it with Black Soot Distress Ink.

For the bricks I sprayed some scrap watercolor paper with Distress Spray Stain in Crackling Campfire and Rusty Hinge and let it dry.  I then used the brick stencil and filled in the bricks with the Distress Grit Paste in Crypt. I let it dry then distressed it with some Black Soot Distress Ink and stenciled on the number 13 from the Lost and Found stencil. I tore the paper into the shape I wanted then dirtied up the torn edges with more Black Soot Distress Ink.

I stamped the undertaker stamp from the Dearly Departed stamp set with Black Soot Distress Archival Ink then placed my components!

Tim Holtz Products Used

Stencils: Bricks THS-038 and Lost and Found THS-051
Black Soot Distress Ink
Hickory Smoke Distress Oxide
Black Soot Distress Archival
Crypt Distress Grit Paste
Grave Distress Texture Paste
Entomology Stamp CMS-328 and Die 663068
Distress Spray Stains Crackling Campfire and Rusty Hinge
Dearly Departed Stamp CMS-413
Distress Mica Stain in Jack-O-Lantern and Crooked Broomstick

Other Products Used

Shimmering Bliss spray from Technique Junkies in Smoldering Ash
Reptile Adhesive
Black Licorice card stock from Simon Says Stamps
Glossy Accents
Posca Pen from Dick Blick
Gauze from my bathroom cabinet.


Wednesday, September 1, 2021


I got my new toys in the mail today and had to have a play! I got the new Distress crayons in Kitsch Flamingo, Salvaged Patina, and Prize Ribbon as well as the Frosted Crystal Distress embossing powder.  

Since next month is Breast Cancer Awareness month and Kitsch Flamingo is the perfect pink, I thought I was put them in partnership on a couple of cards.  

I started with the You Can card by deckling the edges of some cardstock so I could place my colors.  Distress Crayons are so easy! I simply drew some squiggly lines and blended with a damp finger.  I cut out the ribbon with a die and then heat embossed it with the Frosted Crystal then just rubbed the Kitsch Flamingo Crayon all over the top and rubbed it in!  I stamped You Can with Prize Ribbon Distress Oxide then embossed with clear embossing powder.  I then rubbed more of the crayon lightly over the top and wiped with a damp cloth to clean it off the embossing and fussy cut the words. I stacked the ribbon over the top of a couple of white die cuts to add some dimension then used the crayon to color the sides for all over color.  I splattered Kitsch Flamingo Distress Paint all over the background and let it dry.

I stamped the Triumph directly to the paper with the Prize Ribbon Distress Oxide then glued the background panel to a Kraft card base.  I then glued on the ribbon and the You Can and this card was complete.

For the second card I just colored in thick lines and spread with a wet finger, a couple of coats of all three colors.  I then embossed the panel and glued it to a pink card base.  I colored the ribbon with the Kitsch Flamingo Distress Crayon and stacked it with some layers of the same die cut to get the dimension.  

On some white card stock I stamped Kick Cancer's Butt with the Prize Ribbon Distress Oxide then clear heat embossed. I then coated it with the Salvaged Patina crayon and then wiped it down with a wet finger and fussy cut it out. I glued the sentiment right over the top of the ribbon.


 Hi everyone! It's beginning to look a lot like spooky time! This little spooky guy was made with all Tim Holtz products except for the black paper!

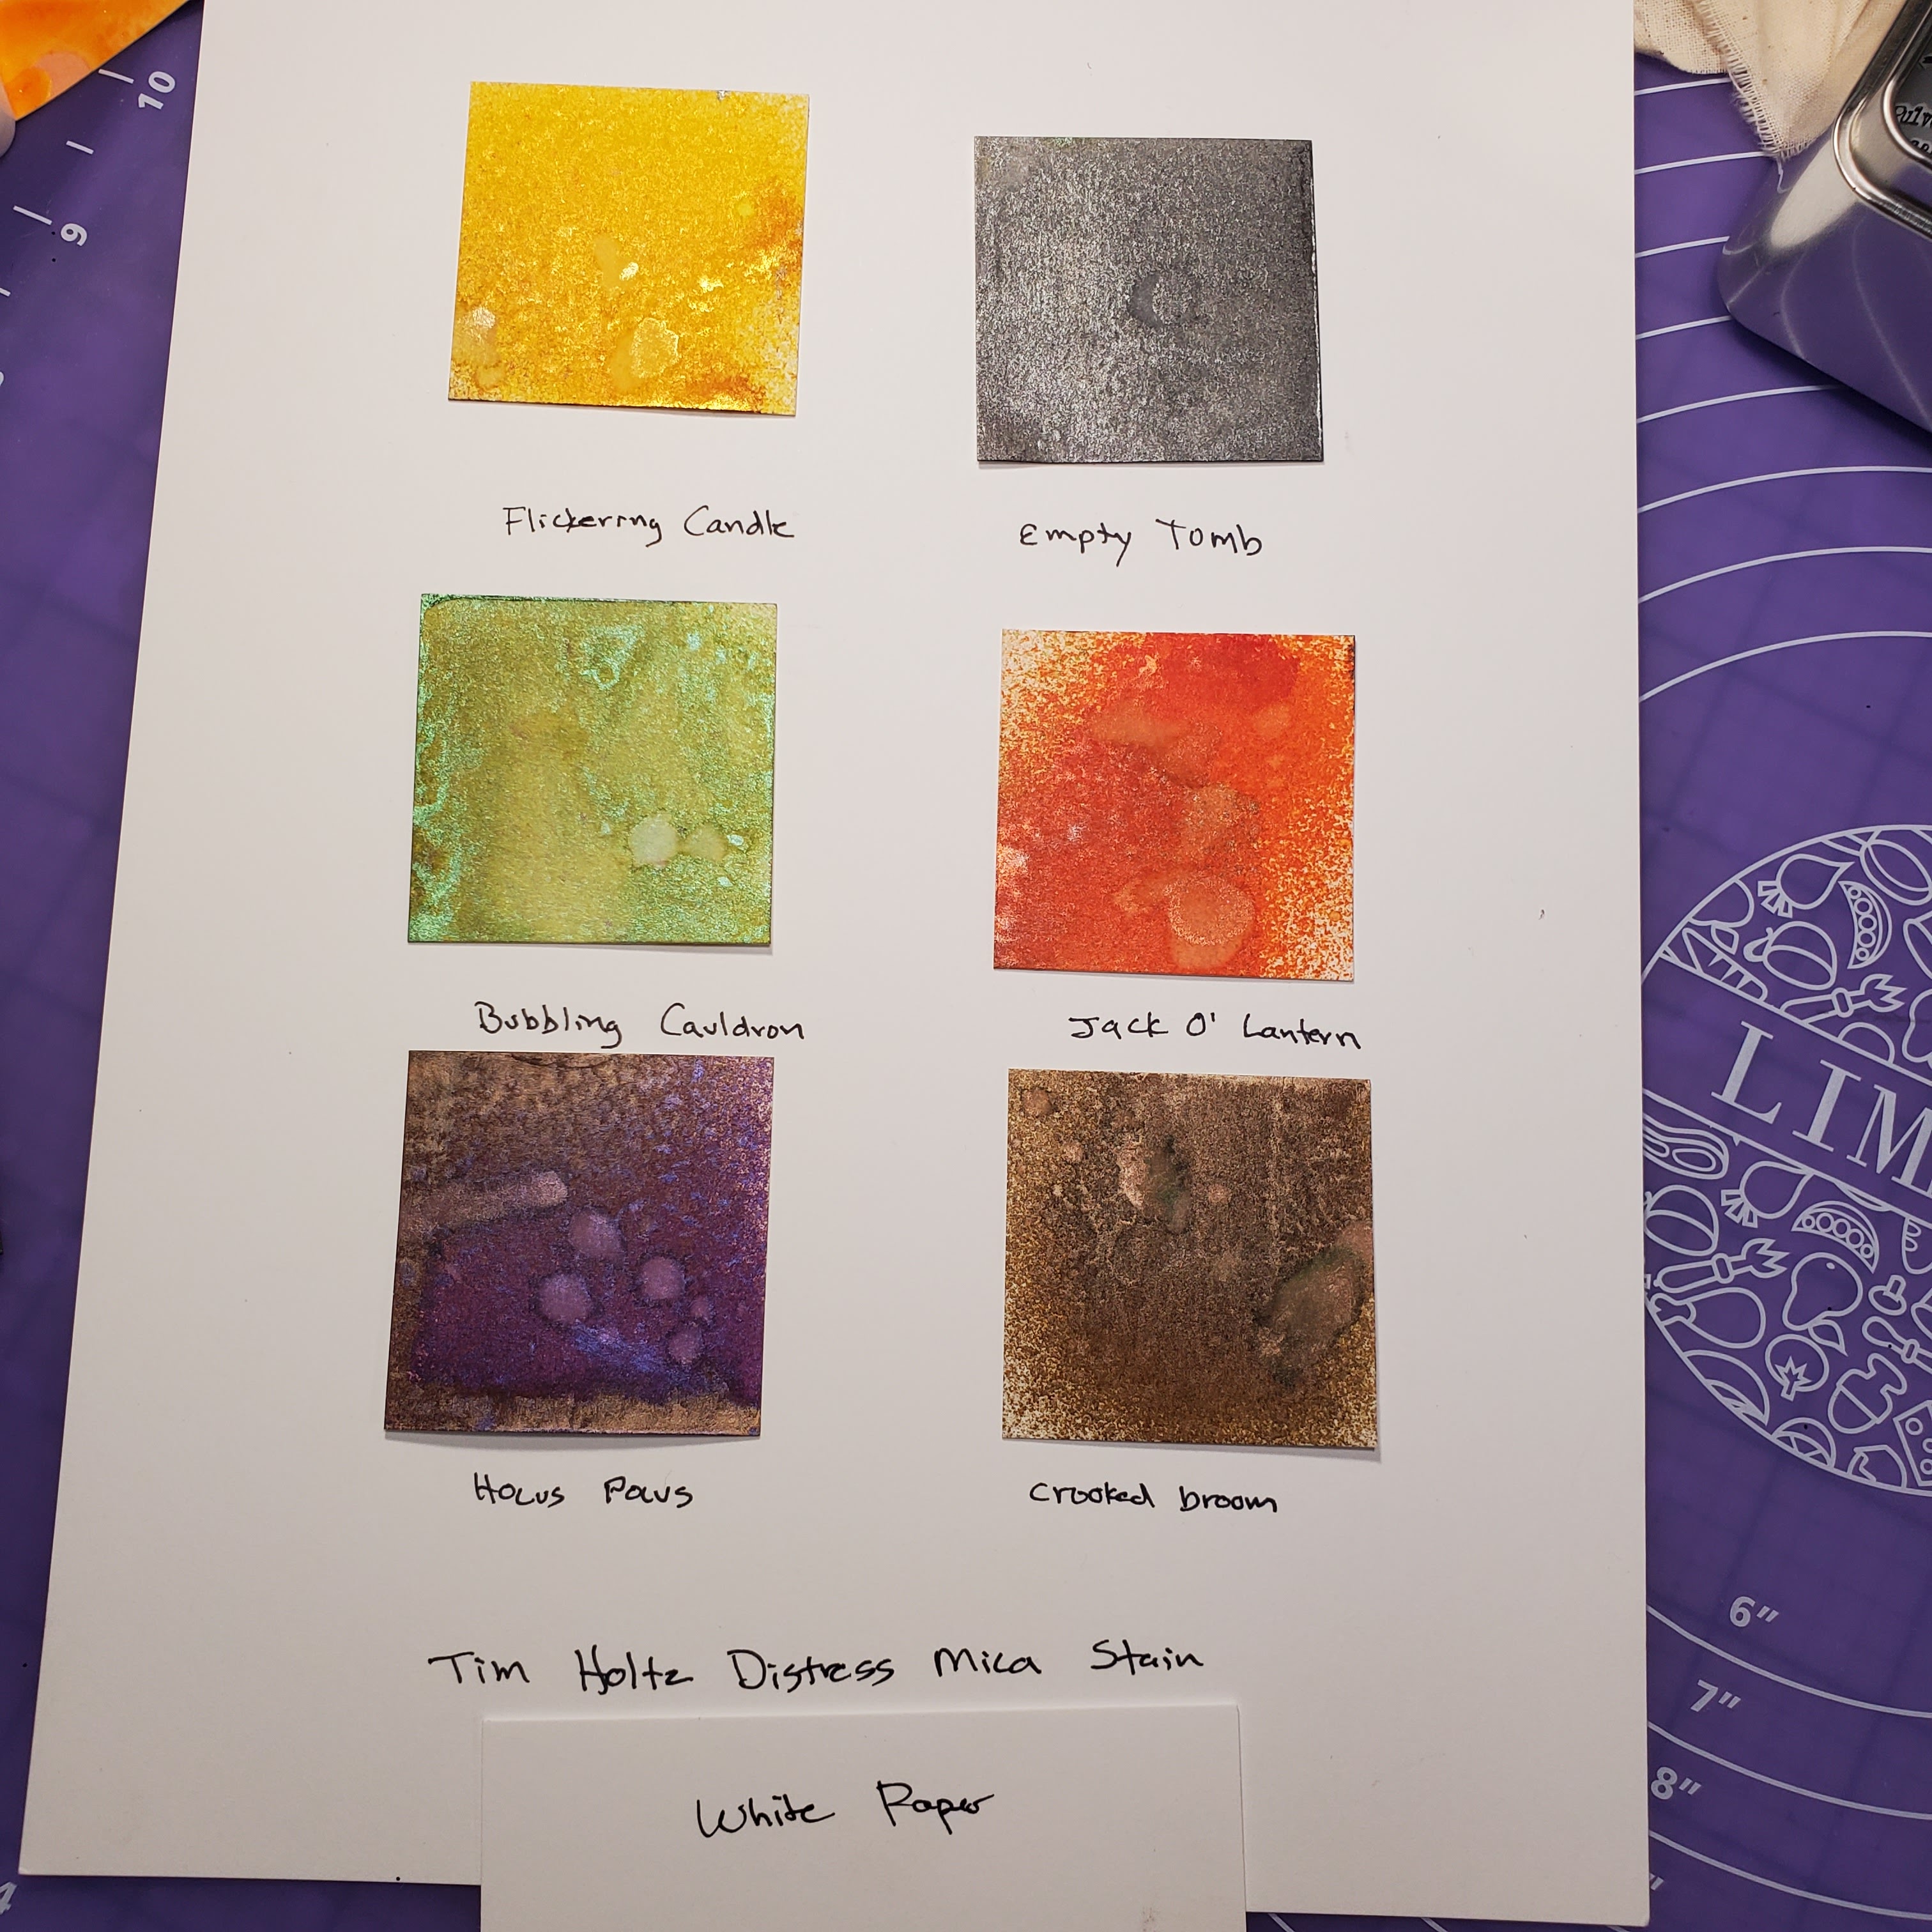
First I created the background using the new Distress Mica Stains.  With the lightest color, Flickering Candle, in the top left corner.  When designing this card, I knew roughly where I wanted things and I truly wanted this spider and her web to stand out.

I followed that with Crooked Broomstick around the perimeter. I love how the Crooked Broomstick and Hocus Pocus look together, so I finished off with Hocus Pocus.  I stamped the candy stealing spider and her web directly to the paper after I threw on a few splashes of Bubbling Cauldron.

Next up was the task of creating the scared pumpkin.  Both the spider and the pumpkin are from Tim Holtz Snarky Cats Halloween set.  First I stamped out the pumpkin then I coated him with the Jack-O-Lantern Distress Mica Stain and used the Bubbling Cauldron for the stem with a paintbrush along with a couple of splashes on the pumpkin for good measure. I cut the top off of the pumpkin and measured some scrap I had with the Flickering Candle Mica Stain to create the inside part of the pumpkin.  

What about his face? His eyes and mouth are cut from one of the stamped Snarky Cats from the original Snarky Cats stamp set. I stamped them on scraps and then fussy cut and glued on his face.

I created the ground by first applying the Distress Texture Paste in Grave, sprayed with more Hocus Pocus Mica Stain then piled on the Distress Mica Flakes in Black.

I lightly and randomly stamped the script from Dearly Departed on the background.  I used the Tattered Harlequin stencil and spread on some of the Grave Texture Paste. My paper wasn't dry enough which resulted in it all peeling off leaving a happy accident on the background!

I stamped the sentiment from the Happy Halloween stamp set onto black cardstock and then white heat embossed it. I cut out the rectangle then coated the edges with more Grave texture paste. I glued it all down to a black card base and Frightened Pumpkin was born!

Last night on my YouTube channel live I talked about finding a stamp, making the investment, in a stamp that is You and is easy to work with, and incredibly versatile.  This Picket Fence Stamps stamp is me 100%.  

This image was created with the assistance of my audience.  I stamped out the stamp on a 4 1/2 by 5 1/4 piece of Tim Holtz Distress Specialty Stamping Paper. It was my first time trying it and it IS good for stamping, but not so much for blending charcoal pencil which was what I attempted around the tops of the toes to give that depth.  I stamped the shoes again on the spider paper from my stash and then fussy cut and paper pieced them on to the paper. I could not find a red marker in my supplies that I was happy with and Pam (PJB Stamper) suggested I try the Lunar Paste from Simon Hurley.  I was super happy with it for the shoelaces. I decided it would be a cool idea to also use the paste for a background so I slathered it on and textured it up. I coated the shoelaces this morning with Glossy Accents from Ranger. 

Next I cut the shoes out and trimmed them to fit the background.  It was too wet to finish last night, so I carried on this morning.

I made some blood drips last year with some red hot glue, but they were not red enough so I decided to also coat them in the red Lunar Paste.  I am pleased with the outcome.  I used a Tim Holtz rub on for the bug and a Tim Holtz sentiment and glued it all together. I matted it with some silver holographic card stock from Simon Says Stamp then mounted it all raised up with foam backing onto some Licorice Black card stock, also from Simon Says Stamp.


I decided to make a holiday card while we were waiting for the Lunar Paste to dry on the Halloween card.  I stamped then gold heat embossed the shoes with Ranger's Princess Gold embossing powder.  I then painted the canvas of the shoes with some light yellow/gold mica watercolor paint from KingsArt.  I grabbed some paper from my extensive stash that I felt would support the holiday feel.  Since the paper was more of an off-white color I decided to fill in the white parts of the shoes with a touch of Tim Holtz Distress Oxide in Antique Linen.

I cut out the shoes and glued them onto the background panel.  Meg suggested that I put some wings on it and I agreed. I grabbed my Wings Impresslit folder from Tim Holtz and Ranger and cut them out of gold cardstock.  I glued them on the shoes and then went to task of finding a sentiment that would not overtake the wings. 

We ran out of time on the live and I took the sentiment part to task this morning.  I used just the word Peace from the Peace on Earth stamp in my Tim Holtz sentiments stamps.  I stamped it out on just some white cardstock with Versafine ink in Nocturn then gold heat embossed with Ranger Gold embossing powder.  I colored over the top again with the Antique Linen and then die cut with one of the dies from my Hero Arts Infinity circle die sets and cut the gold with a larger circle and glued them all on.  I added some confetti from my Honey Bee Stamps confetti collection and mounted on an off-white cardbase. 


Here is the stamp set. I got mine at Scrapbook.com

Here is the video from last night.


Monday, August 23, 2021

 Last night I was invited to do a live video with Nancy Stamps on her channel and boy did we have fun. Mostly, I made a mess, but Nancy did a lot of demo's of 12 things you can do with Spray Stains. We focused on Mica Spray Stains. Here's the video: 


I wanted to make sure and get some makes from all of that alchemy. I got as far as grabbing swatches and snapping pictures and a little make using the Mica Sprays on the wood that we sprayed last night.


Look at that scardy cat! I colored everything with the Tim Holtz Mica Spray Stains and used the Black Glitter from the release as well as some of the black mica that I colored with purple alcohol ink. You should see that in person, it's to die for!

The tablecloth is the gauze I sprayed with the mica stains.  The cat is from Snarky Cats Halloween from Stampers Anonymous and the dies are from Regions Beyond from Sizzix.

As promised I took some still photos of the swatches and here they are! The first 3 are the Tim Holtz Spray Mica Stains.


These are from Technique Junkies and they are called Shimmering Bliss.  The colors are Thulian Pink, Smoldering Ash, and Squeezed Tangerine.


These are my home made mica spray stains, the sparkle to them is not as deep and IT RUBS OFF! 


It was a fun time with Nancy and all of the supplies are listed in her YouTube description. Happy Sparkling!


Tuesday, July 27, 2021

This video is done in two parts. My Samsung phone got hot and shut off during the live so I had to resume with my iPhone!


 Card for the Mod Squad Challenge.  I used the Fall Chrysanthemum Mini layering stamp set for this card. This is my only Kitchen Sink Stamp set and it is the first time using a layering stamp. It is a mini.  My eyes are not cut out for mini! Lots of mistakes and misalignment.  

Thursday, May 6, 2021


Today I got a haul from Technique Junkies and couldn't wait to play with them.  These are my current favorites. Mathematic Equations and Music of Reason.

For the technique I first stamped the background with the Mathematic Equations stamp with gold pigment ink from Scrapbook.com and then added Gold embossing powder from Ranger and heat embossed the entire background.  I went for gold thinking of the equation I put in by hand the "Golden Ratio."

I used the same technique with the sentiment stamp and trimmed the rectangle to be even. I glued that on to some gold foiled paper to create a border. I popped that up on some el cheapo Dollar Tree fun foam and glued it to the background panel.  

I then added more of the el cheapo fun foam to the back of the panel and trimmed down to 4x 5.25 and glued that to the card base. 

I stamped and cut the hat and collar from Stamper's Anonymous Tim Holtz Distinguished I colored the tie and hatband with gold POSCA pen. I printed out the pi and cut it down to fit on the hatband. I used some taller foam tape to attach those to the top and bottom of the sentiment.  This one's for all of the math nerds I know and love.


Saturday, May 1, 2021


Here is the make I did for May 1 Fairy Hugs Design Team.  See more in the video below.

You can find these and many more wonderful stamps at Fairy Stamper!


Wednesday, April 28, 2021

Here is a sneak peek at one of the May release stamps from Fairy Hugs Stamps. The stamp featured here is "Sandy."  I first created the background using Ken Oliver watercolor bursts in blue and green. I then stamped on some of the Frilly Seaweed and Ivy Seaweed in VersaFine Clair in the color Warm Breeze.  I stamped Sandy with Versafine Clair in the color Twilight then coated in clear embossing powder and heat embossed.  Finally, I added the dew drop embellishments that I got from Amazon.

Get your own sea themed stamps starting May 2nd at Fairy Stamper!


Wednesday, April 21, 2021


90th Birthday card I made for my daughter-in-law's great aunt. She said her favorite color was coral and wanted god accents.

Products used: Simon Hurley Stark White cardstock, Tim Holtz Distress Oxides in Abandoned Coral and Crackling Campfire, Princess Gold embossing powder from Ranger Ink. The stamp is Spring Flowers from Technique Junkies and the numbers are from Chapter 2 Sizzix Tim Holtz Countdown.  I used Parklane Gold Mirror cardstock for the numbers and for the matting.

This is my entry for The Mod Squad Challenge
https://modsquadchallenge.com/spring-has-sprung-2/


Saturday, April 10, 2021


Hi everyone. Here is my card share for this week as a design team member for Fairy Hugs Stamps.

The stamps used here were Luna and Hanging Vines.

The background is made from a portion of an alcohol ink painting I created with Tim Holtz Alcohol ink and on Yupo paper, both from Ranger Ink,  and then scanned in to my computer and printed out on card stock to ensure easy stamping.  

I first stamped Luna on plain white card stock and darkened the underbelly with a marker.  I stamped with VersaFine Nocturn ink and then heat embossed with clear embossing powder. I then then fussy cut her out and made sure to outline the edges for a clean-looking cut.  

I stamped the vines in VersaFine Paradise ink.  The sentiment was also stamped in the VersaFine Nocturn and is from Visible Image from a set called Faerie Magic, also purchased from Fairy Stamper.

I trimmed the panel down to 5x3.75 and mounted it onto a piece of glitter cardstock with my Reptile Adhesive. I glued that onto a piece of fun foam.

I then took a plain, white piece of card stock at 4.25 x 5.5 and adhered a piece of mirrored vinyl from my Cricket vinyl that is gathering dust then trimmed to fit.  I mounted the already prepared panel on to that and then mounted Luna with some foam squares that I also added some Reptile Adhesive to ensure a good stick and allow for some movement.

Finally, I added the water drop embellishments that got got from Amazon.

I hope you enjoy Luna and have a happy weekend!

p.s. I do have a couple more videos planed for next week. I got sick with a cold/allergies and the coughing would be very annoying on camera!


Monday, April 5, 2021

More Fun With Oxide Ink

In this video I demonstrate how to create a cool sundog effect for a background.  You will need to either have a die cut or fussy cut image as your focal point because the embossing will impede the clarity of a stamp.  You can view the video below.


Saturday, April 3, 2021

This week's card for Fairy Hugs Stamps features the lovely Ciana offering up her finest bouquet to the moon for being the moon and shining brightly upon the landscape. I created the background in Photoshop and printed it out to be 5x5 and cardstock. I then stamped Ciana, the dancing mushroom and the hanging vines with VersaFine Clair in Nocturn and then heat embossed with WOW Clear Embossing Powder. I mounted it onto a piece of black cardstock cut to 5 1/4 x 5 1/4 and mounted that onto a piece of 5 1/2 x 5 1/2 cardstock that I covered with some of my holographic vinyl from my Cricut who is sitting in a corner unused. I mounted all three layers onto a 5 1/2 x 5 1/2 card base. I cut the sentiment 3 times out of plain white cardstock and glued them all together for some dimension and then cut and another out of cardstock that was covered in white vinyl and glued that to the top and glued it onto the card with liquid adhesive. The sentiment is from Tim Holtz and Sizzix and it's called Friendship Words. Finally I placed all of the rhinestones in the vines on the round spots that would appear to be flower buds. I got these on Amazon and they are designed for nail art.

Fairy Hugs Stamps from Fairy Stamper featured:


Thursday, April 1, 2021


Meet Luna! Luna is a stamp from Fairy Hugs at Fairy Stamper. To get this stamp and many others go to 

Here is a companion video: 


Hi guys, today I would like to introduce my very first YouTube video. It's a tutorial on how I make my Aurora Borealis background. Here's a tip.  Scan your background into your computer and then open it in an editor, make sure it's the right size for print then print out copies. You can also manipulate the hues and come up with some amazing backgrounds!


Saturday, March 27, 2021


Hi everyone. I wanted to share my first post as part of the Fairy Hugs Stamps design team. Each week you will see a new entry here with details on how I created the card or mixed media piece. 

On this card I have featured two of the Fairy Hugs stamps Wisdom and Cirlig the dragon.  The background was created with Tim Holtz distress inks and oxides and I am hoping to present my debut for my YouTube channel with a tutorial on how to get this effect that I call an Aurora.  Stay tuned for more info!

I stamped Cirlig onto the panel with Versafine Clair ink in black and then used clear embossing powder to get that shine. I next stamped the sentiment in Versamark ink and gold heat embossed.  I matted the panel with gold glitter paper and mounted that all onto a black A4 card panel.  I added the little jewel embellishments which are actually meant for fingernails! That's it, super simple card!


Tuesday, March 9, 2021


This is my Homage to David Rose and Schitt's Creek!
Products used will be listed at the bottom.

Processes:

First, I created the sign.  I had no idea where it might take me, but I was inspired by some advertisement on my Facebook feed.  I cut out the tiny, tiny letters in black vinyl stuck to 110lb card stock. I knew that I wanted to curve the Apothecary so I cut out a circle on some Post-It and laid it down on the Ranger Manila colored heavy card stock. I fumbled and fought to get the letters spaced and around the bottom of the circle using Ranger Multi-Media Matte. I then imagined that I would need a rose in the center, so I glue the Rose word straight and centered across the top. That took a good hour, the letters kept popping off my tweezers.

I knew I wanted it to look like a metal sign so I coated the whole thing in the texture paste and waited for it to dry.  I rubbed it into the letters with my fingers.  Once dry, I painted it with the Kitsch Flamingo and let that dry. Finally, I took the Vintage Photo Distress Crayon and began rubbing it on, taking it off, rubbing it on again until I was happy with the result. I used a Tombo eraser to sand some of the pain off of the letters.  I used a generic die to cut the sign shape. I glued on the rose ephemera and then tried to distress it and wound up rubbing the design off so I just glued another one on top of it! I cut some fun foam the same shape and glued it to the back of the sign then used some brads to make it look like it was mounted with, well, brads. I distressed the edges and then set it aside to work on the panel.

For the panel, I used the stamp and smudge technique with the various stamps and colors.  I die cut some heavy card stock and used it as a stencil and stenciled the crackle paste in the corner. I pulled off the paper and immediately coated the paste with the Kitsch Flamingo Distress Glaze and let it dry. I then heated the glaze until it melted and let it cool. I coated the whole corner then with the Distress Crayon in Walnut Stain. I used some Vintage Photo and Ground Espresso to distress the whole panel.

Next, I sprayed some Distress Mica Spray on the sign and smudged it around then glued the sign onto the panel.  I found a paper doll I thought might look like a pharmacist and trimmed off the body parts that would be hidden by the sign and then coated him with Distress Glaze in Rusty Hinge and glued him on.  I found an appropriate jumble of words and glued that on and distressed it with the vintage photo left on my brush.   

Tim Holtz/Ranger products used:

663089 Mixed Media Halloween #2
664177 Sizzix Thinlits Die Set 140PK - Alphanumeric Label
Ranger Distress Texture paste in smooth and crackle
Distress Collage Medium
Distress Paint in Kitsch Flamingo
Distress Glaze in Rusty Hinge and Kitsch Flamingo
Distress Crayons in Vintage Photo, Walnut Stain, Antique Bronze, and Black Soot
Mr Bones CMS345
Dearly Departed CMS413
Examination CMS412
Faded Type CMS397 
Distress Spray Stain in Rusty Hinge
Distress Mica Spray in Antique Bronze
Sticker from Clippings
Paper Doll
Ephemera (I think Field Notes)
Distress Ink in Black Soot and Vintage Photo
Distress Oxide in Rusty Hinge, Vintage Photo, and Ground Espresso