Saturday, April 30, 2022

Lemons


This cheerful? card showcases the stamp "Lemons" from the April 2022 Technique Junkies release. You can find this and many more at https://techniquejunkies.com/april-2022-stamp-release/ Use the code TJ10Color to save 10%! I started out with using some watercolor paper and some Squeezed Lemonade Ink Stain and then topped it with Iridescent Shimmering Bliss from Technique Junkies. I die cut and colored the lemons from one of my die sets in my stash and auditioned them around the Lemons stamp that I had stamped with black ink and cut out with a rounded rectangle die. Once happy with the placement, I glued down the lemons and then popped up my Lemons sentiment. I popped the panel up onto a white card base and then glued on some clear drops embellishments! So easy!


Thursday, April 21, 2022

Art Stacks Paper Card Design


This is a card I made using multiple papers from Art Stacks.  

Art Stacks is a small, family owned paper design business based out of Australia. They sell physical paper packs and also digital!  I have used the digital version for my card design today.  You can find all of the pretty papers here.  

My background was printed on Hamilco glossy paper from the Lorraine Haight Moraine Backstacks collection. I fussy cut the window from the Doors and Windows Cardstack collection and the man in the wonderful jacket from the Lorraine Haight Moraine "Altered Ancestors" collection.

I first glued down the window and added a bit of shadow around the outside edge with my Tim Holtz Distress Crayon in black. I outlined the gentleman in black and popped him up on the card with a bit of foam tape. I wanted to make sure I placed my elements to still be able to showcase the beautiful sunflower in the background.   

I just got my Distress Translucent Crackle Paste in the mail that day so I decided to test it out for a more mixed media vibe. I spread a bit on the window and on the top corner and let it dry then used my Vintage Photo Distress Crayon to sort of fill in the cracks.

I cut out and colored one of the sentiments from the Words of Wisdom mini stack and sort of arched it over the gentleman's legs.  I grabbed a bee from my stash and glued it onto the sunflower then ripped a couple of scraps and stuck them down on the side of the card.

I finished it off with a few small dots of a diamond paste from my stash and my card was complete!

Be sure to visit Art Stacks for tons of inspiration and unique papers!


Today I am featuring Technique Junkies #SD1087 Born to Garden and #S960 In the Meadow stamps.

I started off by stamping the In the Meadow stamp on to some 80lb white cardstock in the color Pink Peony Ranger Archival ink.  I trimmed it down to 4 inches wide and trimmed off the bottom so there was about 3 1/2 inches. I glued that down to another piece of white cardstock 4 1/4 x 5 1/2 on the top half. I trimmed some roses cardstock from my stash down to 4 inches wide then glued it on to the bottom then trimmed everything to fit 4 x 5 1/4.  I grunged up the whole thing with Vintage Photo ink then sprayed with a little water and some Shimmering Bliss spray in Iridescent and set it aside to dry.

Next, I stamped out the Born to Garden on a piece of 120lb white cardstock also in the Pink Peony. I set that aside then stamped just the garden part in Versafine Clair Acorn then heat embossed with clear embossing powder then fussy cut and edged the garden plank.  I cut out the feature phrase with a die from my stash and then lightly bordered it with the Vintage Photo ink.  

Next, I used some double sided tape to stick the sari ribbon down and then popped the panel up onto a Kraft card base with some foam tape.  I then used more foam tape to pop up the phrase in the middle of the card and also some more foam tape to pop up the garden plank.  I finished it off with 3 little pearls.


Don't forget you can save 10% using my discount code TJ10Color!
https://techniquejunkies.com/


Thanks for stopping by!


Wednesday, April 20, 2022

Saturday, April 16, 2022

New Filming Surface


I needed to find a solution for a filming surface that didn't have a glare with my lights so I set out to make one myself and here is the result.

The Process

I bought some sticky shelf liner and then set out to find exactly what I might stick it to! A 12x12 surface is too small so I needed something bigger. Rummaging through my seemingly endless craft supplies I came across this 16x16 ruler.  It's a strip cutting ruler from back when I was a dedicated quilter and has sat untouched for maybe 8 years.  Sacrifices HAVE to be made.  I stuck the shelf liner to it, but it just looked, I don't know, plasticky and still shiny.

Okay, what if I dab alcohol ink all over it and make it look like a sort of marbled wood surface? Okay I grabbed my 3 go-to browns, Latte, Caramel, and Coffee and started dabbing on with the felt pad.  Looked good, but STILL shiny.  

What if I coat the whole thing in Collage Medium? That's matte, right? So I did.  It was better and I was good with it until....I SPOTTED the collage paper in my stash. I thought I might just tear a little piece off from the Aviary roll and stick it in the corner to see how it might look.  The Collage Medium was still wet so, why not? 

The next thing you know there are rolls of Collage Paper all over my desk and paper flying every which way until I finally had the entire thing covered. YES! Matte and pretty. But...there are some "bald" spots so I had to bring in backup.  Mind you, this needs to be flat with no bumpety areas. Stamping was the perfect solution.  I stamped with several different sets and several different Distress Archival Inks until I was happy with the end result.

Products Used

Stamps
CMS394 Tiny Text
CMS365 Stitches
CMS395 The Professor
CMS345 Mr. Bones
CMS396 Field Label
CMS401 Flower Shop
CMS089 Bitty Grunge
CMS024 Winged Things 1
CMS180 Bird Feather

Distress Archival Ink
Black Soot
Peeled Paint
Ground Espresso
Fired Brick
Rustic Wilderness
Crackling Campfire
Vintage Photo

Collage Paper
Aviary
Botanical
Entomology
Plain

Alcohol Inks
Latte, Caramel, and Coffee

Distress Collage Medium


I buy my inks and other supplies at Ranger Ink

Ranger
https://shareasale.com/r.cfm?b=1152523&u=2847800&m=78320&urllink=&afftrack=


Friday, April 15, 2022

The Blooming Experiment

Someone recently asked in a group what some of our favorite inks are.  Now that's a HARD question to answer because it depends on what outcome I am looking for.  In today's experiment I am testing out four ink brands for what I call the "bloom" effect.  Basically how the inks react on watercolor paper.  I used the same paper for each ink group and the same water bottle ;).

Let me just start with what led me to try this.


This was done with Lavinia "Elements" ink.  Would you just look at that fractally goodness! Such an amazing reaction.  I decided to see if I could get sort of the same effect with some other brands of dye inks.

Let's start out with Catherine Pooler inks.  For the experiment, I tried to use similar colors. I used Pucker Up, Cummerbund, and Catching Rays.

It did break up a bit, but more in larger chunks.  Do you think it passes the bloom test?

Next up, Simon Hurley inks. I used Lovestruck, Shooting Star, and Clear Skies

The colors blended together beautifully, but again, I did not get the fractal appearance and again just larger bleached out chunks.

Okay, next up, Tim Holtz Distress Inks.  I used Squeezed Lemonade, Mermaid Lagoon, and Picked Raspberry.

The chunks were even larger here as the water wanted to pool up rather than spread.

Now finally I thought I would be fair and get a closer color range with the Lavinia Elements inks. I used Blue Lagoon, Sundance, and Mulberry.

To be fair, Lavinia makes deeper and earthier tones.  Whatever is in the ink formula, the reaction to water is different. It doesn't seem to bleach as much if you don't dab it.

So which is my favorite ink? I will say again, it depends on the outcome I am looking for!

Thanks for stopping by!


Thursday, April 7, 2022

More from the April 2022 Technique Junkies Release!


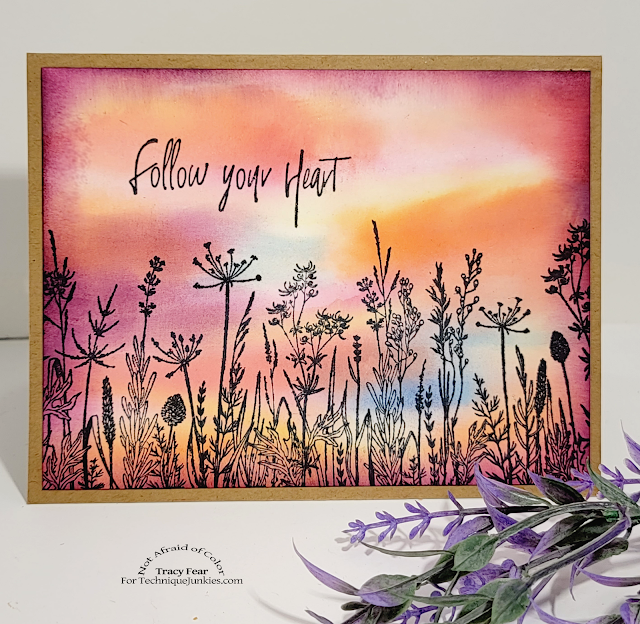
For today's card I created a background on watercolor paper using Distress Oxides in Spun Sugar, Saltwater Taffy, Picked Raspberry, Dried Marigold, Spiced Marmalade, and Candy Apple along with a little Salvaged Patina and Some Lavinia ink in Mulberry for a vignette feature.  I laid each color down randomly in lines from light to dark then doused with water to blend the colors in.  I repeated this again to gain more intensity of color.  I then stamped the new In The Meadow #S960 with Versafine Clair in black.

I next created the vignette and added a bit more color using a light hand with the Distress Oxides in Spiced Marmalade. 

I stamped the Outside sentiment from the Inside Out: Size matters #SS139 Follow Your Heart and set the panel aside.

I grabbed a piece of Accent Opaque 80lb cardstock in white and stamped the inside sentiment ( Take Your Brain With You) also in the Versafine Clair in black and trimmed that down to 5 x 3 3/4 and attached it to the inside of a Kraft card base.  I glued the outside panel to the outside of the card base and our card was done! 


Friday, April 1, 2022

April 2022 Technique Junkies Release Party!

 Introducing April 2022 

Technique Junkies New Release!


I am pleased to have become part of the Technique Junkies Design Team.  Look for many posts featuring Technique Junkies stamps in the coming months!  


You can get 10% off your purchase of Technique Junkie products excluding Gotta Have It All bundles and card kits by using my coupon code TJ10Color. If you do purchase the new release at 15% off, please mention my name Tee or Not Afraid of Color in the comments section of checkout!


Today's cards feature #S947 BoHo Dots Background.  The design is flowing circles of many size dots great for any type of background.  For this first card, I used some stencil brushes and pounced color directly on to the stamp  with Lavinia Inks. You can use any kind of juicy ink!

Next, I used one of the inks to create a vignette around the outside edge. I used another TJ stamp SD717 Never Stop Flying from my massive stash of TJ stamps and stamped that down on to some Bristol Smooth card stock.  I used a die to cut it into an oval shape and then painted the wings with the same colors from the background. I used some of the wet ink to splatter some color all over then created a vignette around that as well.

I glued some foam that I cut out to the back of the oval then glued that down to the background. I then glued it all to a white card base.


For this card I used some Catherine Pooler inks and tamped them on with stencil brushes as well, but this time I used the stamping platform because I planned to do another step with embossing.  Once the first layer was dried, I stamped again with Versamark ink and then embossed with Catherine Pooler and WOW Halo embossing powder.  

Next I used some spray stains to add color to the background and dried thoroughly.  I used the Magical die from my stash and cut it out three times in white and once in holographic paper and glued them all together to add dimension. I cut out the shadow layer in some silver glitter paper and glued it down to the background.  I cut a mat layer with the same holographic paper and glued the background down to it then glued those down to a pink card base.  Last, I glued the Magical word down and added some confetti to finish off the magical look!

Here is a video for you to see the process.